Cocos2d-x游戏实例-《跑跑跑》制作教程
笨木头花心贡献,啥?花心?不呢,是用心~ 转载请注明,原文地址:http://www.benmutou.com/archives/27
正文:
首先,我是拜读了以下四篇文章之后,想练练手而萌发了要写这个系列的教程,大家如果不喜欢我的教程,可以看看以下四篇教程,同样会获益匪浅的:
http://blog.csdn.net/fengyun1989/article/details/7526333
http://blog.csdn.net/fengyun1989/article/details/7529606
http://blog.csdn.net/fengyun1989/article/details/7534784
http://blog.csdn.net/fengyun1989/article/details/7537602
以上四篇是很好的一份教程,强烈推荐大家去看看。
我这系列的教程会稍微写得繁琐一些,因为我想写得维护性好一些。
来吧,开始~!
本教程使用Cocos2d-x 2.0.4版本。
第一个版本的《跑跑跑》源码+资源下载地址:
云盘下载: http://yunpan.cn/lk/sV2K9ZKSnIVMC?sid=301
CSDN下载(稍后补上):http://download.csdn.net/detail/musicvs/4769412
Cocos2d-x游戏实例-《跑跑跑》制作教程(第一篇)——加载地图
本篇要做的事情很简单,就是利用TiledMap创建一张很长的地图,噗,我就不考虑占内存的因素哈,我还不太懂怎么优化一张大地图的加载。
1. 新建我们的项目
我想把它命名为RunRunRun,是的,我们这是要做一个奔跑游戏,最近有些累,尽情跑一回吧~
2. 稍微调整一些参数,我把屏幕定为800 * 500的大小:
不准问我在哪改啊,我才不会告诉你是在main.cpp里的,然后找到下面两句:
[cce_cpp] CCEGLView* eglView = CCEGLView::sharedOpenGLView(); eglView->setFrameSize(800, 500);</pre> <span style="font-family: Calibri; font-size: 14px;">setFrameSize(800, 500); [/cce_cpp]
OK~ 3. 我们来创建几个文件夹,以便为我们的代码分类: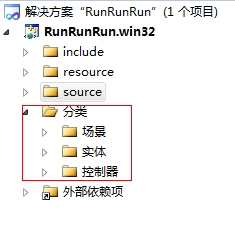
哈哈,是的,接下来我要逐渐建立3块很重要的的模块:场景、实体、控制器。 4. 先不管其他,我们先来创建场景——跑步的场景。如上图,大家新建一个TollgateScene.cpp以及头文件TollgateScene.h。 [cce_cpp]// TollgateScene.h
#ifndef __TOLLGATE_SCENE_H__ #define __TOLLGATE_SCENE_H__
#include "cocos2d.h"
using namespace cocos2d;
class TollgateScene : public CCLayer { public: CREATE_FUNC(TollgateScene);
virtual bool init(); static CCScene* scene();
};
#endif [/cce_cpp] [cce_cpp]// TollgateScene.cpp
#include "TollgateScene.h"
CCScene* TollgateScene::scene() { CCScene* mScene = CCScene::create();
TollgateScene* mLayer = TollgateScene::create();
mScene->addChild(mLayer);
return mScene; }
bool TollgateScene::init() { CCTMXTiledMap* map = CCTMXTiledMap::create("map/level01.tmx"); this->addChild(map); return true; } [/cce_cpp]
  代码很简单,我不做过分的解释,主要看看init函数。 CCTMXTiledMap是cocos2d-x提供给我们用来加载tmx地图文件的,tmx地图文件从哪里来呢?我要介绍一个很厉害的软件了: Tiled Map Editor。很厉害的,官网是: http://www.mapeditor.org/ 大家下载一下,我们要利用它来创建我们的地图,也就是上面代码里的level01.tmx文件。

5.      用Tiled Map Editor创建地图文件

打开这个软件,新建一个文件,我们的把地图设长一点,宽120块,高20块,宽高像素都是32。

我们需要一些素材(请下载游戏demo源码,里面的resource文件夹有素材):


把ground.png图片拖入软件的图块区域:


块的宽高都是32像素,点确定,ok~


 现在我们可以开始创建我们的地图了,在图块里选择一个元素,然后就可以在地图区域绘制地图:


下面是我画的(很丑,不要介意~噗):


 6.      准备运行项目

现在,把我们的level01.tmx以及ground.png文件放到项目资源目录下,我建了一个map目录:Resourcesmap,地图的资源都放这了。 然后,还记得我们要怎么加载地图吗?
[cce_cpp]bool TollgateScene::init()
{
    CCTMXTiledMap* map = CCTMXTiledMap::create("map/level01.tmx");
    this->addChild(map);
    return true;
}
[/cce_cpp]
  然后把我们默认启动场景设置为TollgateScene:
[cce_cpp]bool AppDelegate::applicationDidFinishLaunching()
{
    // initialize director
    CCDirector *pDirector = CCDirector::sharedDirector();
    pDirector->setOpenGLView(CCEGLView::sharedOpenGLView());

    CCEGLView::sharedOpenGLView()->setDesignResolutionSize(1024, 640, kResolutionExactFit);

    // turn on display FPS
    pDirector->setDisplayStats(true);

    // set FPS. the default value is 1.0/60 if you don't call this
    pDirector->setAnimationInterval(1.0 / 60);

    // create a scene. it's an autorelease object
    CCScene *pScene = TollgateScene::scene();

    // run
    pDirector->runWithScene(pScene);
    return true;
}
[/cce_cpp]
OK,编译运行,我们会看到我们的地图,帅呆了,噗…才怪啊~!丑死了~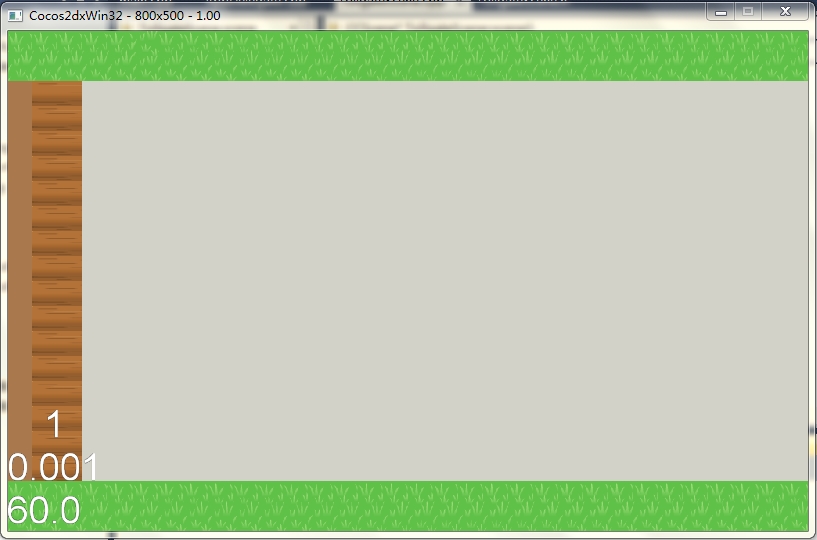
7. 部分朋友可能会报错
也许有人运行项目时会报错,说找不到png图片,没关系,用文本编辑器打开我们level01.tmx文件,找到下面这段数据:
<tileset firstgid="1" name="ground" tilewidth="32" tileheight="32"> <image source="ground.png" width="420" height="316"/> </tileset>看看我们的image source里的ground.png是不是绝对路径,是的话,改成相对路径。
下一篇我们将加入我们的主角,这可不会太简单呢,因为我们要设计地更好维护一些。
(发布时间:也许是今天晚上,不,一定是今天晚上~)
 我也是Java出身的,一开始确实十分不习惯vs,用多了就感觉还是挺方便的~不过新建类的时候始终是没有eclipse方便