经过前面的介绍,我们已经知道了JobComponentSystem和IJobForEach,也了解了C# Job System可以并行执行Job来提升性能。
我们知道,IJobForEach这种Job,只能一个个实体进行处理,这次要介绍的IJobChunk,是可以对某个块(Chunk)里的所有实体进行批量处理。
虽然结果是一样的(仍然是一个Cube在旋转),但代码却大不相同,一起来看看吧。
这个组件仍然是带有一个字段,但是,大家注意一下,和之前的组件对比,这次的组件并没有使用GenerateAuthoringComponent特性,而是使用了Serializable特性。
因为这个Demo里,官方又给我们展示了另外一种相对而言更灵活的实体创建方式,这里先不纠结,后面会说到。
好,感觉有点乱是不是,不要着急,慢慢来。
首先,我们仍然继承了JobComponentSystem,这个很熟悉。
其次,仍然重写了OnUpdate函数,这个也很熟悉,我们最终也需要返回一个JobHandle对象。
EntityQuery是用来筛选实体的,通过调用GetEntityQuery函数,可以获取EntityQuery对象。
GetEntityQuery可以传递多个组件的类型作为参数,后续将会筛选出包含指定类型的实体。

我们获得的EntityQuery对象要用在什么地方呢?
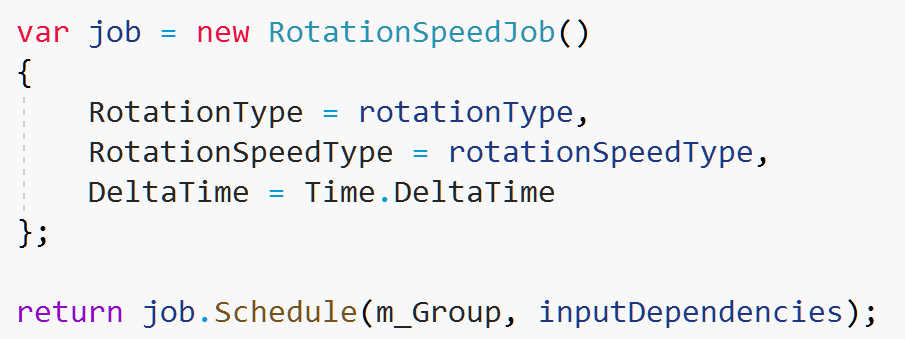
我们看看OnUpdate函数的最后一行:return job.Schedule(m_Group, inputDependencies); 这里把EntityQuery传递给Schedule函数,于是就能筛选实体数据,传递给Job。
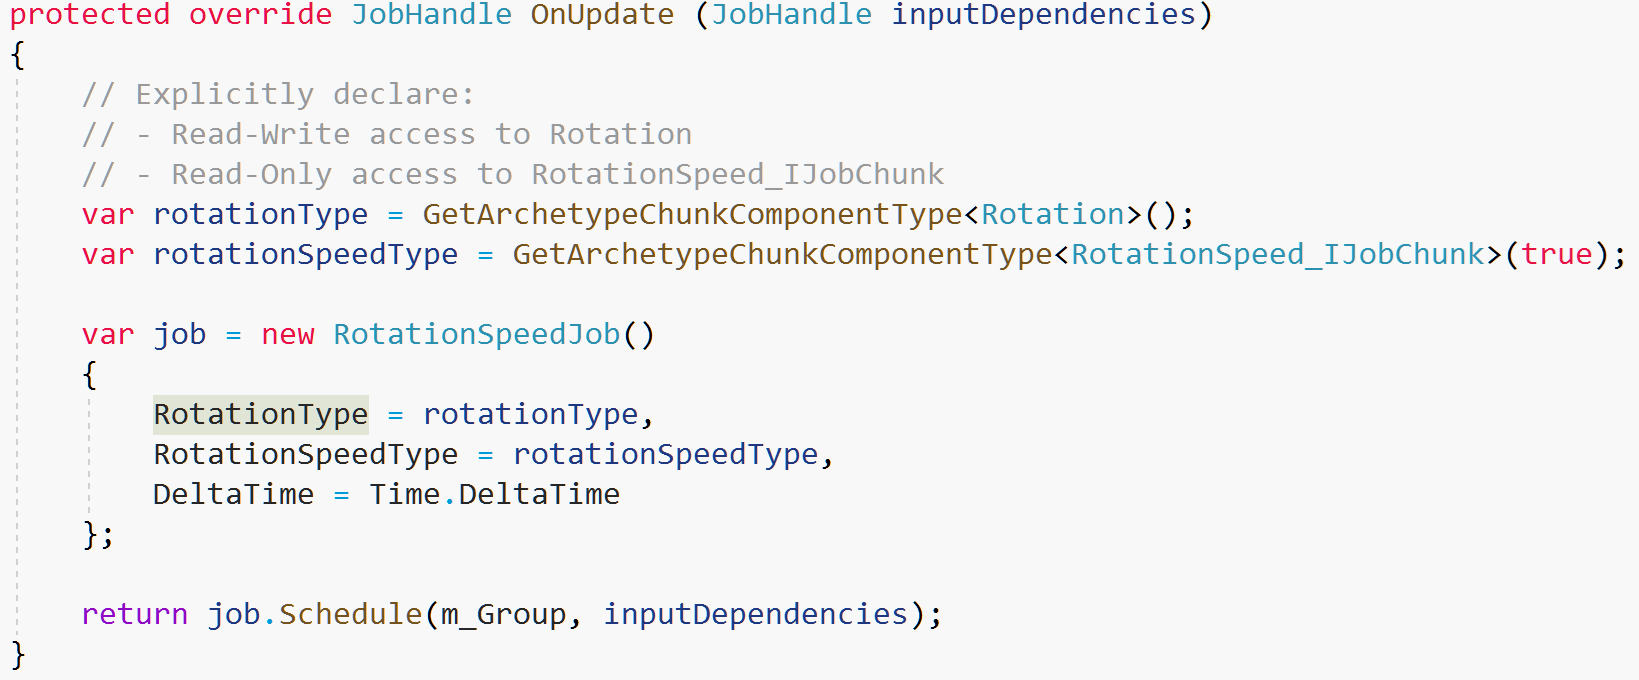
我们先看看OnUpdate函数里是怎么使用RotationSpeedJob的:

RotationSpeedJob需要三个字段,其中DeltaTime是我们大家熟悉的,不多说。
另外两个字段代表了某个原型的块的组件类型(ArchetypeChunkComponentType),很绕,但其实说白了,就是组件类型。
通过GetArchetypeChunkComponentType函数,可以获得某个原型的块的组件类型…
唔,总之,我们获得了Rotation组件和RotationSpeed_IJobChunk组件的类型(ArchetypeChunkComponentType)。
另外,GetArchetypeChunkComponentType函数可以传递一个参数,代表是否只读。
这是什么意思呢?代表筛选出来的数据是否是只读的,这可以提升游戏的性能,当然这里又不说了(旁白:嗯嗯,你不懂的就不说是吧)。
我们的RotationSpeedJob是实现了IJobChunk接口的,之前我没有把RotationSpeedJob的内容贴出来,现在来看看:
顶部的BurstComplie特性就是所谓的"爆破"编译,总之加上去就能提升Job的性能,具体不展开,以后再聊。
RotationSpeedJob有三个字段,之前已经提到过了,现在来看看Execute函数。
稍微有点乱,我们一步步来:
a. 首先,我们在外部调用了RotationSpeedJob的Schedule函数:

并且给Schedule函数传递了m_group(EntityQuery)对象,inputDependencies参数不管它,我不懂,所以它不重要(害羞)。
这代表,我们的RotationSpeedJob将会获得通过EntityQuery筛选后的块数据。
b. 回到RotationSpeedJob的Execute函数,第一个参数【ArchetypeChunk chunk】是什么呢?它就是经过EntityQuery筛选后获得的块数据。
c. 注意,这个chunk代表的是一个块数据。也就是说,我们筛选出来的实体可能存放在不同的块里,Execute函数每次只能获得一个块里的数据。并且,同一时间可能会有很多个RotationSpeedJob被执行(并行),大幅提升了性能,这个和IJobForEach类似。
d. 通过调用chunk的GetNativeArray函数,可以获得这个块里的所有实体的某个类型的组件。
如:var chunkRotations = chunk.GetNativeArray(RotationType);
可以获得当前块的所有实体的RotationType类型的组件(即,Rotation组件)。
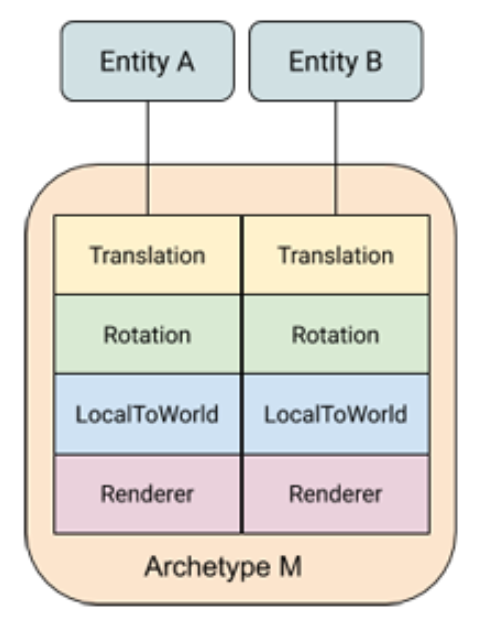
再次看看下面这张图,EntityA和EntityB是属于同一个块的,假设当前chunk就是这个块,那么,chunkRotations变量保存的就是EntityA和EntityB的Rotation组件(两条数据)。

e. 最后就简单了,对获取出来的组件进行取值或者赋值。
按照官方的说法,使用IJobChunk来获取数据,更高效、灵活,这里暂时不深入。
这次不一样,这个Demo又给我们展示了另外一种更加灵活的方式去创建实体,先新建一个类:
也是一步步来解释:
a. 这个类继承了MonoBehaviour,实现了IConvertGameObjectToEntity接口,使用了RequiresEntityConversion特性。
b. 将这个类挂到Cube上,就会自动将Cube转换为ECS的实体对象。
c. IConvertGameObjectToEntity接口需要实现Convert函数。
d. 这个Convert函数里,我们new一个RotationSpeed_IJobChunk组件对象,然后通过EntityManager的AddComponentData将组件附加到实体上。
e. 于是,我们就将Cube转换为了一个带有RotationSpeed_IJobChunk的ECS实体。
为什么说这种方式更加灵活?因为我们可以给实体附加任意多个组件(在Convert函数里可以给实体Add任意多个组件对象)。
而如果使用GenerateAuthoringComponent特性将组件转换为实体,那就只能给实体附加单个组件了。

唔…结果仍然是一个Cube在转,我就不贴效果图了。
目前来说,我是体会不到特别明显的优势,可能要深入学习ECS后才能体会。
也许IJobForEach就是简化后的IJobChunk?(瞎猜)
后续还有其他一些Job,我们未来再说。
注意,本系列教程基于DOTS相关预览版的Package包,是预览版,不代表正式版的时候也适用。
转发本系列文章的朋友请注意,带上原文链接和原文日期,避免误导未来使用正式版的开发者。
我们知道,IJobForEach这种Job,只能一个个实体进行处理,这次要介绍的IJobChunk,是可以对某个块(Chunk)里的所有实体进行批量处理。
虽然结果是一样的(仍然是一个Cube在旋转),但代码却大不相同,一起来看看吧。
1.组件(Component)
接下来开始看代码吧,先创建一个组件类:using System;
using Unity.Entities;
[Serializable]
public struct RotationSpeed_IJobChunk : IComponentData
{
public float RadiansPerSecond;
}这个组件仍然是带有一个字段,但是,大家注意一下,和之前的组件对比,这次的组件并没有使用GenerateAuthoringComponent特性,而是使用了Serializable特性。
因为这个Demo里,官方又给我们展示了另外一种相对而言更灵活的实体创建方式,这里先不纠结,后面会说到。
2.系统(System)
接下来,我们要看新的System是怎么做的了,注意,现在要看新System的代码了,我们来创建一个System类:using Unity.Burst;
using Unity.Collections;
using Unity.Entities;
using Unity.Jobs;
using Unity.Mathematics;
using Unity.Transforms;
// This system updates all entities in the scene with both a RotationSpeed_IJobChunk and Rotation component.
public class RotationSpeedSystem_IJobChunk : JobComponentSystem
{
EntityQuery m_Group;
protected override void OnCreate ()
{
// Cached access to a set of ComponentData based on a specific query
m_Group = GetEntityQuery(typeof(Rotation), ComponentType.ReadOnly<RotationSpeed_IJobChunk>());
}
// Use the [BurstCompile] attribute to compile a job with Burst. You may see significant speed ups, so try it!
[BurstCompile]
struct RotationSpeedJob : IJobChunk
{
// 太复杂,这个结构体的内容被我删掉了
}
// OnUpdate runs on the main thread.
protected override JobHandle OnUpdate (JobHandle inputDependencies)
{
// Explicitly declare:
// - Read-Write access to Rotation
// - Read-Only access to RotationSpeed_IJobChunk
var rotationType = GetArchetypeChunkComponentType<Rotation>();
var rotationSpeedType = GetArchetypeChunkComponentType<RotationSpeed_IJobChunk>(true);
var job = new RotationSpeedJob()
{
RotationType = rotationType,
RotationSpeedType = rotationSpeedType,
DeltaTime = Time.DeltaTime
};
return job.Schedule(m_Group, inputDependencies);
}
}好,感觉有点乱是不是,不要着急,慢慢来。
首先,我们仍然继承了JobComponentSystem,这个很熟悉。
其次,仍然重写了OnUpdate函数,这个也很熟悉,我们最终也需要返回一个JobHandle对象。
3.EntityQuery
然后,重写了OnCreate函数,并且多了一个EntityQuery字段,这个是重点。EntityQuery是用来筛选实体的,通过调用GetEntityQuery函数,可以获取EntityQuery对象。
GetEntityQuery可以传递多个组件的类型作为参数,后续将会筛选出包含指定类型的实体。

注:GetEntityQuery还有更多更强大的筛选方式(and、or、not),这里不展开。
关于EntityQuery,后续我会专门写一篇教程。
我们获得的EntityQuery对象要用在什么地方呢?
我们看看OnUpdate函数的最后一行:return job.Schedule(m_Group, inputDependencies); 这里把EntityQuery传递给Schedule函数,于是就能筛选实体数据,传递给Job。
4.RotationSpeedJob(IJobChunk)
和IJobForEach的用法类似,我们把逻辑放到Job中,由于RotationSpeedJob的代码看起来比较复杂,我没把它贴出来,先不管。我们先看看OnUpdate函数里是怎么使用RotationSpeedJob的:

RotationSpeedJob需要三个字段,其中DeltaTime是我们大家熟悉的,不多说。
另外两个字段代表了某个原型的块的组件类型(ArchetypeChunkComponentType),很绕,但其实说白了,就是组件类型。
通过GetArchetypeChunkComponentType函数,可以获得某个原型的块的组件类型…
唔,总之,我们获得了Rotation组件和RotationSpeed_IJobChunk组件的类型(ArchetypeChunkComponentType)。
另外,GetArchetypeChunkComponentType函数可以传递一个参数,代表是否只读。
这是什么意思呢?代表筛选出来的数据是否是只读的,这可以提升游戏的性能,当然这里又不说了(旁白:嗯嗯,你不懂的就不说是吧)。
5.IJobChunk
好了,现在来到最重要的部分。我们的RotationSpeedJob是实现了IJobChunk接口的,之前我没有把RotationSpeedJob的内容贴出来,现在来看看:
    [BurstCompile]
    struct RotationSpeedJob : IJobChunk
    {
        public float DeltaTime;
        public ArchetypeChunkComponentType<Rotation> RotationType;
        [ReadOnly] public ArchetypeChunkComponentType<RotationSpeed_IJobChunk> RotationSpeedType;

        public void Execute (ArchetypeChunk chunk, int chunkIndex, int firstEntityIndex)
        {
            var chunkRotations = chunk.GetNativeArray(RotationType);
            var chunkRotationSpeeds = chunk.GetNativeArray(RotationSpeedType);
            for (var i = 0; i < chunk.Count; i++)
            {
                var rotation = chunkRotations[i];
                var rotationSpeed = chunkRotationSpeeds[i];

                // Rotate something about its up vector at the speed given by RotationSpeed_IJobChunk.
                chunkRotations[i] = new Rotation
                {
                    Value = math.mul(math.normalize(rotation.Value),
                        quaternion.AxisAngle(math.up(), rotationSpeed.RadiansPerSecond * DeltaTime))
                };
            }
        }
}顶部的BurstComplie特性就是所谓的"爆破"编译,总之加上去就能提升Job的性能,具体不展开,以后再聊。
RotationSpeedJob有三个字段,之前已经提到过了,现在来看看Execute函数。
稍微有点乱,我们一步步来:
a. 首先,我们在外部调用了RotationSpeedJob的Schedule函数:

并且给Schedule函数传递了m_group(EntityQuery)对象,inputDependencies参数不管它,我不懂,所以它不重要(害羞)。
这代表,我们的RotationSpeedJob将会获得通过EntityQuery筛选后的块数据。
b. 回到RotationSpeedJob的Execute函数,第一个参数【ArchetypeChunk chunk】是什么呢?它就是经过EntityQuery筛选后获得的块数据。
c. 注意,这个chunk代表的是一个块数据。也就是说,我们筛选出来的实体可能存放在不同的块里,Execute函数每次只能获得一个块里的数据。并且,同一时间可能会有很多个RotationSpeedJob被执行(并行),大幅提升了性能,这个和IJobForEach类似。
d. 通过调用chunk的GetNativeArray函数,可以获得这个块里的所有实体的某个类型的组件。
如:var chunkRotations = chunk.GetNativeArray(RotationType);
可以获得当前块的所有实体的RotationType类型的组件(即,Rotation组件)。
再次看看下面这张图,EntityA和EntityB是属于同一个块的,假设当前chunk就是这个块,那么,chunkRotations变量保存的就是EntityA和EntityB的Rotation组件(两条数据)。

e. 最后就简单了,对获取出来的组件进行取值或者赋值。
按照官方的说法,使用IJobChunk来获取数据,更高效、灵活,这里暂时不深入。
6.创建实体
最后一步,创建实体,以前是直接给组件加上一个GenerateAuthoringComponent特性就能自动创建实体。这次不一样,这个Demo又给我们展示了另外一种更加灵活的方式去创建实体,先新建一个类:
using Unity.Entities;
using Unity.Mathematics;
using UnityEngine;

[RequiresEntityConversion]
public class RotationSpeedAuthoring_IJobChunk : MonoBehaviour, IConvertGameObjectToEntity
{
    public float DegreesPerSecond = 360.0F;

    // The MonoBehaviour data is converted to ComponentData on the entity.
    // We are specifically transforming from a good editor representation of the data (Represented in degrees)
    // To a good runtime representation (Represented in radians)
    public void Convert (Entity entity, EntityManager dstManager, GameObjectConversionSystem conversionSystem)
    {
        var data = new RotationSpeed_IJobChunk { RadiansPerSecond = math.radians(DegreesPerSecond) };
        dstManager.AddComponentData(entity, data);
    }
}
也是一步步来解释:
a. 这个类继承了MonoBehaviour,实现了IConvertGameObjectToEntity接口,使用了RequiresEntityConversion特性。
b. 将这个类挂到Cube上,就会自动将Cube转换为ECS的实体对象。
c. IConvertGameObjectToEntity接口需要实现Convert函数。
d. 这个Convert函数里,我们new一个RotationSpeed_IJobChunk组件对象,然后通过EntityManager的AddComponentData将组件附加到实体上。
e. 于是,我们就将Cube转换为了一个带有RotationSpeed_IJobChunk的ECS实体。
为什么说这种方式更加灵活?因为我们可以给实体附加任意多个组件(在Convert函数里可以给实体Add任意多个组件对象)。
而如果使用GenerateAuthoringComponent特性将组件转换为实体,那就只能给实体附加单个组件了。
7.运行
同样的,我们新建一个场景,创建一个Cube,把RotationSpeedAuthoring_IJobChunk、ConvertToEntity挂到Cube上,然后运行,就能看到新Demo的效果了。
唔…结果仍然是一个Cube在转,我就不贴效果图了。
8.IJobChunk的优势
官方的说法是,IJobChunk可以对整个块的实体进行操作,更加灵活。目前来说,我是体会不到特别明显的优势,可能要深入学习ECS后才能体会。
也许IJobForEach就是简化后的IJobChunk?(瞎猜)
后续还有其他一些Job,我们未来再说。
注意,本系列教程基于DOTS相关预览版的Package包,是预览版,不代表正式版的时候也适用。
转发本系列文章的朋友请注意,带上原文链接和原文日期,避免误导未来使用正式版的开发者。
1 条评论
发表评论